Public MetaMap Installation on Windows
Willie Rogers
Introduction
A brief guide to installing MetaMap on Windows.
Prerequisites
To use the MetaMap distribution the following is required:
- A minimum of 12 gigabytes of free disk space.
- WinZip or tar to extract the distribution
- Java 6 or newer JRE or SDK installed, you'll need to know the location of the installation of Java later when installing MetaMap.
Downloading
The distribution is available at the MetaMap Main Download Page URL: MainDownload.html
Select the download link of the latest version of MetaMap available on the download page.
When you click on the download link, you'll be taken to the UTS authentication website where you will asked to login using your UTS username and password. Once you've logged in, the file will automatically download. Extract the distribution using WinZip.
An Important Note about Special Characters
Whenever possible, avoid the use of file and directory names that contain spaces, semi-colons, and most other punctuation; MetaMap and its associated programs can have problems reading names composed with such characters.
Graphical Install
Using Windows Explorer find the "public_mm" directory extracted from the distribution archive. Click on the icon with the name "Install MetaMap". The dialog will display an input box with the label "Location of the Public MetaMap Directory:" filled in with the probable location where you've installed the distribution.

If the location is incorrent, you can change it by clicking the "Browse" button and using the file dialog to locate the directory or typing in the location in the input text box. When the "public_mm" location is set click the "Next" button to go to the next dialog.
The next dialog will display one of possible locations where the Java Runtime Environment (JRE) is installed. This information is obtained from the Windows Registry which was set when one of the JREs was installed.
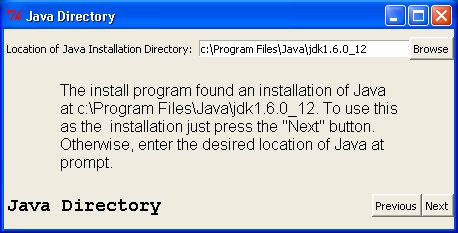
If the JRE location displayed is not the one you wish to use, change it by clicking the "Browse" button and using the file dialog to locate the proper directory or type in the location in the input text box. When the proper JRE location is set click the "Next" button to go to the next dialog.
The next dialog will display a results of install.
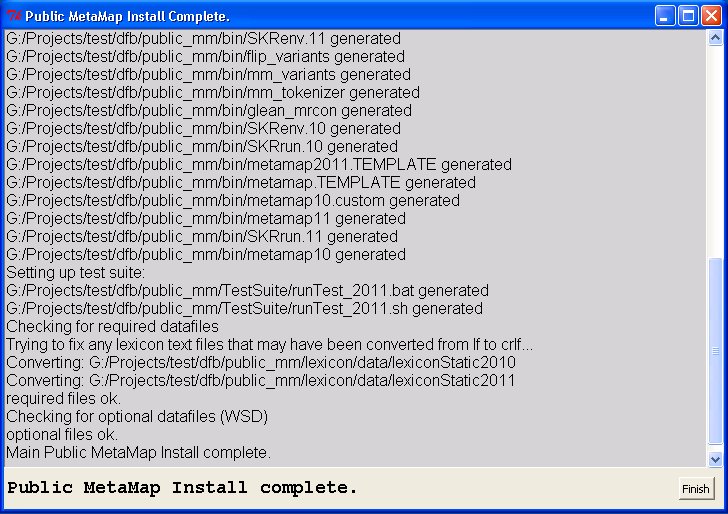
If no errors are present in the log you can close the installation program by pressing the "Finish" button. After that, skip to the section on running MetaMap.
Terminal Based Install
To start a "Command Prompt" window on Windows XP use:
Start Menu -> All Programs -> Accessories -> Command Prompt
In the command prompt window cd to the public_mm directory in the directory where you downloaded MetaMap.
Microsoft Windows XP [Version 5.1.2600]
(C) Copyright 1985-2001 Microsoft Corp.

C:\Documents and Settings\enzo>g:

G:\>cd test\public_mm
The next step of the installation will require your entering two paths:
- The full pathname (including the drivename) of the folder where the MetaMap distribution was unpacked; this path should end with "public_mm", e.g., /g/Test/Download/public_mm
Be sure to have these two paths available before running the installation program.
G:public_mm>set PWD=G:\test\public_mm

Enter basedir of installation [G:/test/public_mm]]:
bindir: G:/test/public_mm/bin
Basedir is set to G:/test/public_mm.

The WSD Server requires Sun's Java Runtime Environment (JRE);
Sun's Java Developer Kit (JDK) will work as well.  if the
command: "which" java returns /usr/local/jre1.4.2/bin/java, then the
JRE resides in /usr/local/jre1.4.2/.

Where does your distribution of Sun's JRE reside?
Enter home path of JRE (JDK) [/c/Program Files/Java/jdk1.6.0_12]:
G:/public_mm/WSD_Server/config/disambServer.cfg generated
G:/public_mm/WSD_Server/config/log4j.properties generated
Setting up bin directory scripts:
G:/public_mm/bin/BuildDataFiles generated
G:/public_mm/bin/dfbuilder.profile generated
G:/public_mm/bin/LoadDataFiles generated
G:/public_mm/bin/loaddatafiles.sh generated
G:/public_mm/bin/rundatafiles.sh generated
G:/public_mm/bin/skrmedpostctl generated
G:/public_mm/bin/wsdserverctl generated
G:/public_mm/bin/mmserver11.bat generated
G:/public_mm/bin/builddatafiles.sh generated
G:/public_mm/bin/form_opt generated
G:/public_mm/bin/metamap11.bat generated
G:/public_mm/bin/skrmedpostctl_start.bat generated
G:/public_mm/bin/skrmedpostctl_stop.bat generated
G:/public_mm/bin/wsdserverctl_start.bat generated
G:/public_mm/bin/wsdserverctl_stop.bat generated
G:/public_mm/bin/mmserver11 generated
G:/public_mm/bin/testapi.sh generated
G:/public_mm/bin/testapi.bat generated
G:/public_mm/bin/SKRenv.11 generated
G:/public_mm/bin/flip_variants generated
G:/public_mm/bin/mm_variants generated
G:/public_mm/bin/mm_tokenizer generated
G:/public_mm/bin/glean_mrcon generated
G:/public_mm/bin/filter_mrconso generated
G:/public_mm/bin/SKRenv.10 generated
G:/public_mm/bin/SKRrun.10 generated
G:/public_mm/bin/metamap2011.TEMPLATE generated
G:/public_mm/bin/metamap.TEMPLATE generated
G:/public_mm/bin/metamap10.custom generated
G:/public_mm/bin/metamap11 generated
G:/public_mm/bin/SKRrun.11 generated
G:/public_mm/bin/metamap10 generated
Setting up test suite:
G:/public_mm/TestSuite/buildTestSuite09.sh generated
G:/public_mm/TestSuite/runTest_2009.sh generated
G:/public_mm/TestSuite/runTest_2010.sh generated
Checking for required datafiles

Public MetaMap Install Settings:

Public MetaMap basedir: G:/public_mm
Public MetaMap Program Dir: G:/public_mm/bin
Java Home dir: /c/Program Files/Java/jdk1.6.0_12
G:\public_mm>
Running MetaMap
Start a "Command Prompt" window and start a Bourne shell in it and cd to the public_mm directory:
Microsoft Windows XP [Version 5.1.2600]
(C) Copyright 1985-2001 Microsoft Corp.

C:\Documents and Settings\enzo>g:
G:\>cd test\public_mm
Make sure the bin directory of the Java installation directory that you specified during the install is in your path. You can check the path by inspecting the PATH environment variable:
G:\public_mm> set PATH
Path=c:\Program Files\Microsoft Visual Studio 9.0\ ...
...
If it is not in your path, you can add it using the export command. For example:
G:\public_mm> set PATH=%PATH%:%JAVA_HOME%\bin
Replace "%JAVA_HOME%" with the installation directory you specified during the install.
Start another "Command Prompt" window and then start the MedPost Tagger in the window:
C:\Documents and Settings\enzo> g:
G:\> cd test\public_mm
G:\Projects\test\dfb\public_mm> bin\skrmedpostctl_start.bat

<The following is output from the script: >

G:\Projects\test\dfb\public_mm>set BASEDIR=g:\Projects\test\dfb\public_mm

G:\Projects\test\dfb\public_mm>set MEDPOSTDIR=g:\Projects\test\dfb\public_mm\MedPost-SKR

G:\Projects\test\dfb\public_mm>set CLASSPATH=g:\Projects\test\dfb\public_mm\MedPost-SKR\
Tagger_server\lib\taggerServer.jar;g:\Projects\test\dfb\public_mm\MedPost-SKR\Tagger_server\lib\mps.jar

G:\Projects\test\dfb\public_mm>set SERVERDIR=g:\Projects\test\dfb\public_mm\MedPost-SKR\Tagger_server

G:\Projects\test\dfb\public_mm>set DATADIR=g:\Projects\test\dfb\public_mm\MedPost-SKR\data

G:\Projects\test\dfb\public_mm>set PID_FILE=g:\Projects\test\dfb\public_mm\MedPost-SKR\Tagger_server\log\pid

G:\Projects\test\dfb\public_mm>set LOG_FILE=g:\Projects\test\dfb\public_mm\MedPost-SKR\Tagger_server\log\log

G:\Projects\test\dfb\public_mm>set ERR_FILE=g:\Projects\test\dfb\public_mm\MedPost-SKR\Tagger_server\log\errors

G:\Projects\test\dfb\public_mm>set LEXDBFILE=g:\Projects\test\dfb\public_mm\MedPost-SKR\data\lexDB.serial

G:\Projects\test\dfb\public_mm>set NGRAMFILE=g:\Projects\test\dfb\public_mm\MedPost-SKR\data\ngramOne.serial

G:\Projects\test\dfb\public_mm>set SERVERPORT=1795

G:\Projects\test\dfb\public_mm>set JVMOPTIONS=-Dtaggerserver.port=1795
-DlexFile=g:\Projects\test\dfb\public_mm\MedPost-SKR\data\lexDB.serial
 -DngramOne=g:\Projects\test\dfb\public_mm\MedPost-SKR\data\ngramOne.serial

G:\Projects\test\dfb\public_mm>cd g:\Projects\test\dfb\public_mm\MedPost-SKR\Tagger_server

G:\Projects\test\dfb\public_mm\MedPost-SKR\Tagger_server>java
 -Dtaggerserver.port=1795
 -DlexFile=g:\Projects\test\dfb\public_mm\MedPost-SKR\data\lexDB.serial
 -DngramOne=g:\Projects\test\dfb\public_mm\MedPost-SKR\data\ngramOne.serial
 -cp g:\Projects\test\dfb\public_mm\MedPost-SKR\
Tagger_server\lib\taggerServer.jar;g:\Projects\
test\dfb\public_mm\MedPost-SKR\Tagger_server\lib\mps.jar taggerServer
IMPORTANT: It is necessary to run the both the Tagger server, the WSD server, and MetaMap in separate windows to prevent a condition in which the shell shuts down the servers after MetaMap is exited.
If you want to run the WSD Server start it in another "Command Prompt" window similarly to the way you started the Tagger server:
C:\Documents and Settings\enzo> g:
G:\>cd test\public_mm
G:\test\public_mm> bin\wsdserverctl_start.bat
loading properties file G:/public_mm/WSD_Server/config/disambServer.cfg
In the first command prompt window you should be able to run MetaMap:
G:\test\public_mm> bin\metamap13.bat

<The following is output from the script: >

/g/Test/public_mm/bin/SKRrun.13 /g/Test/public_mm/bin/metamap13.BINARY.MINGW32_NT-5.1 -L 2013 -Z 2013AA
Berkeley DB databases (NLM 2013AA strict model) are open.
Static variants will come from table varsan in G:/public_mm/DB/DB.NLM.2013AA.strict.
Derivational Variants: Adj/noun ONLY.
Accessing lexicon G:/public_mm/lexicon/data/lexiconStatic2013.
Variant generation mode: static.

metamap13.binary.mingw32_nt-5.1 (2013AA)

Control options:
  lexicon_year=2013
  mm_data_year=2013AA
|: obstructive sleep apnea
|:

Processing 00000000.tx.1: obstructive sleep apnea
Established connection to Tagger Server on localhost.
Processing 00000000.tx.1: obstructive sleep apnea

Phrase: "obstructive sleep apnea"
Meta Candidates (9):
  1000 Obstructive sleep apnoea (Sleep Apnea, Obstructive) [Disease or Syndrome]
   901 Apnea, Sleep (Sleep Apnea Syndromes) [Disease or Syndrome]
   827 APNOEA (Apnea) [Finding,Pathologic Function]
   827 Sleep [Organism Function]
   827 Obstructive (Obstructed) [Functional Concept]
   827 Apnea (Apnea Adverse Event) [Finding]
   793 Sleeping (Asleep) [Finding]
   755 Sleepy [Finding]
   727 Sleeplessness [Sign or Symptom]
Meta Mapping (1000):
  1000 Obstructive sleep apnoea (Sleep Apnea, Obstructive) [Disease or Syndrome]
|:
Java API users
To get the Java API go to the MetaMap Java API page: JavaApi.html .